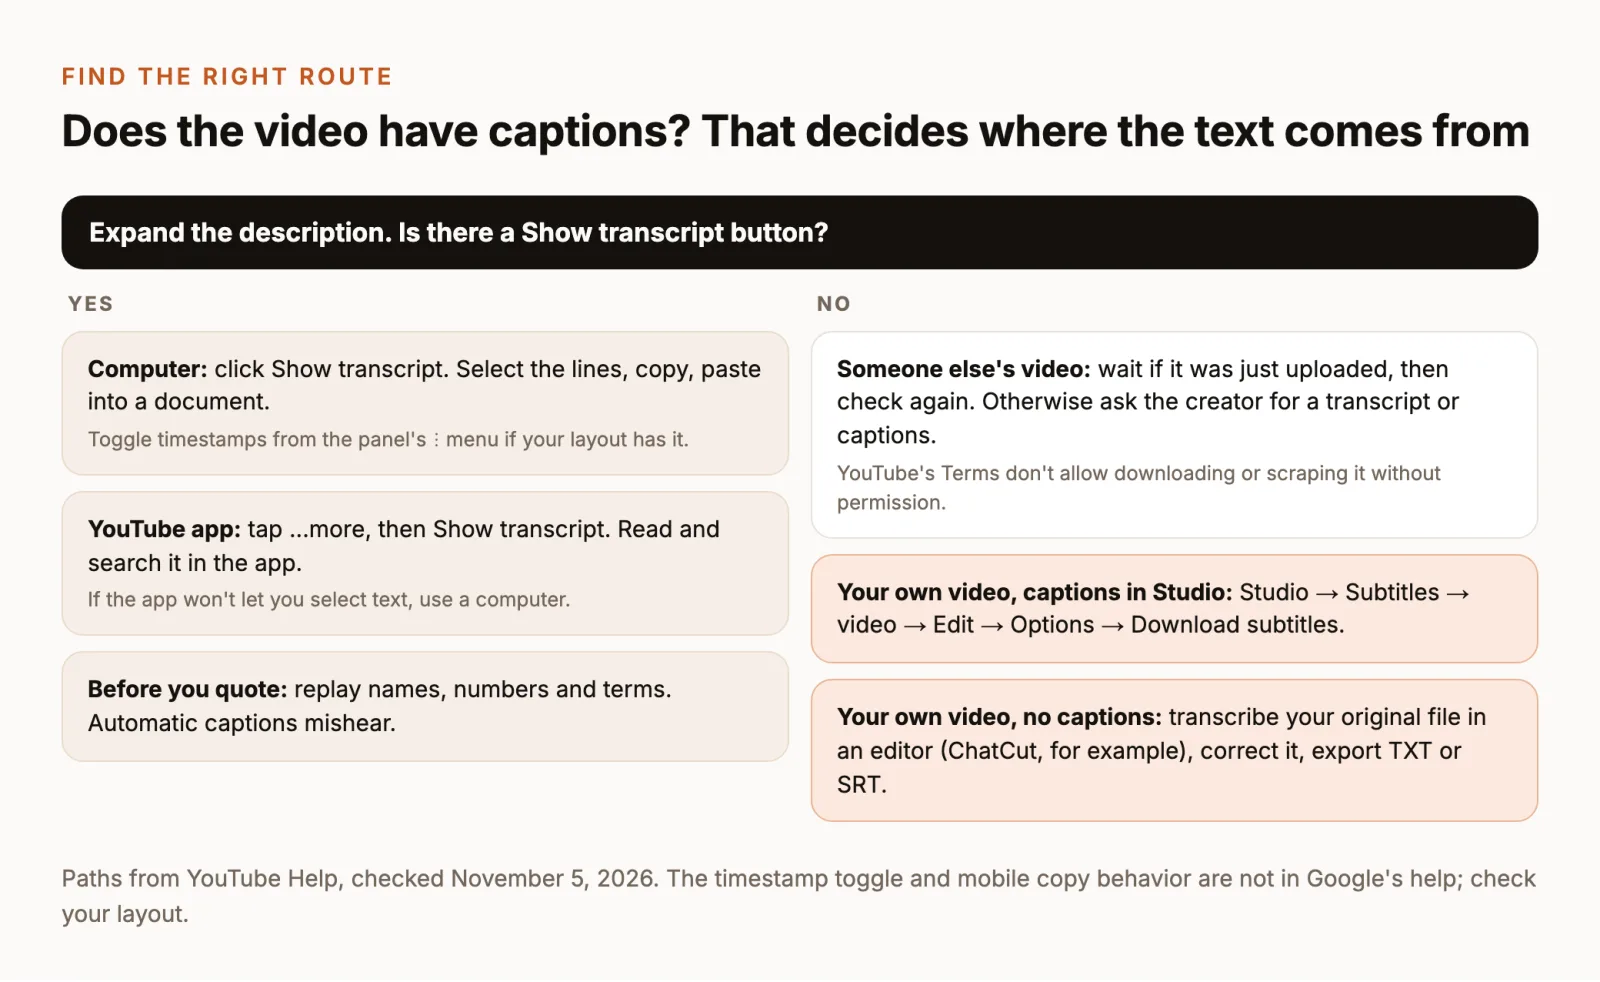
To get a transcript of a YouTube video, open the video, expand its description and select Show transcript. The full text opens beside the player on a computer, or under it in the YouTube app, and you can select and copy it on a computer. The button only appears when the video has captions, either uploaded by the creator or generated automatically by YouTube.
This guide covers the desktop and mobile steps, copying the text with or without timestamps, why the button is sometimes missing, and what to do when the video is yours: download its captions from YouTube Studio, or transcribe the original file and export a TXT or SRT. It doesn’t cover extracting text from other people’s videos with download or scraping tools, which YouTube’s Terms of Service don’t allow.
Get a transcript of a YouTube video on a computer
Google’s View video transcripts help page describes the core steps. They work in any desktop browser on youtube.com.
- Open the video and let the page finish loading.
- Expand the description. Click the description box under the title, or …more at its end.
- Scroll to the bottom of the description and click Show transcript in the Transcript section.
- Read the panel. The transcript opens beside the player and scrolls along with the video, highlighting the current line.
- Jump around. Click any line to move the video to that moment.
The panel also shows chapters when the creator added them. If the description has no Transcript section, the video has no captions yet; see why the button is missing below.
To find videos that do have captions before you start, search YouTube, select Filters and choose Subtitles/CC. Captioned results show a CC label (Google’s guide).
View the transcript in the YouTube app
The route is the same on iPhone, iPad and Android: Google’s help page gives identical steps for Android and iOS.
- Open the video in the YouTube app.
- Tap the title or …more below the player to open the description.
- Swipe to the end of the description and tap Show transcript.
- Scroll the text, and tap a line to jump to that moment.
Viewing is easy on a phone; copying isn’t. Zapier’s walkthrough reports that it found no way to copy text from the app and that the mobile website lacked the Show transcript option. We couldn’t confirm either from Google’s help, so check your own app version. If you can’t select the text, open the video on a computer when you need the words in a document.
Copy the transcript, with or without timestamps
On a computer, select the text in the transcript panel by dragging from the first line to the last, copy it (Ctrl+C on Windows, Cmd+C on a Mac) and paste it into a document. For a long video, the panel may load lines as you scroll, so scroll to the end first, then copy in a few chunks and check that the last line of each chunk meets the first line of the next.
In current desktop layouts, the panel’s ⋮ menu has an option to toggle timestamps, which several guides describe. It isn’t in Google’s help, so if your layout doesn’t show it, copy with timestamps and remove them afterwards with find-and-replace.
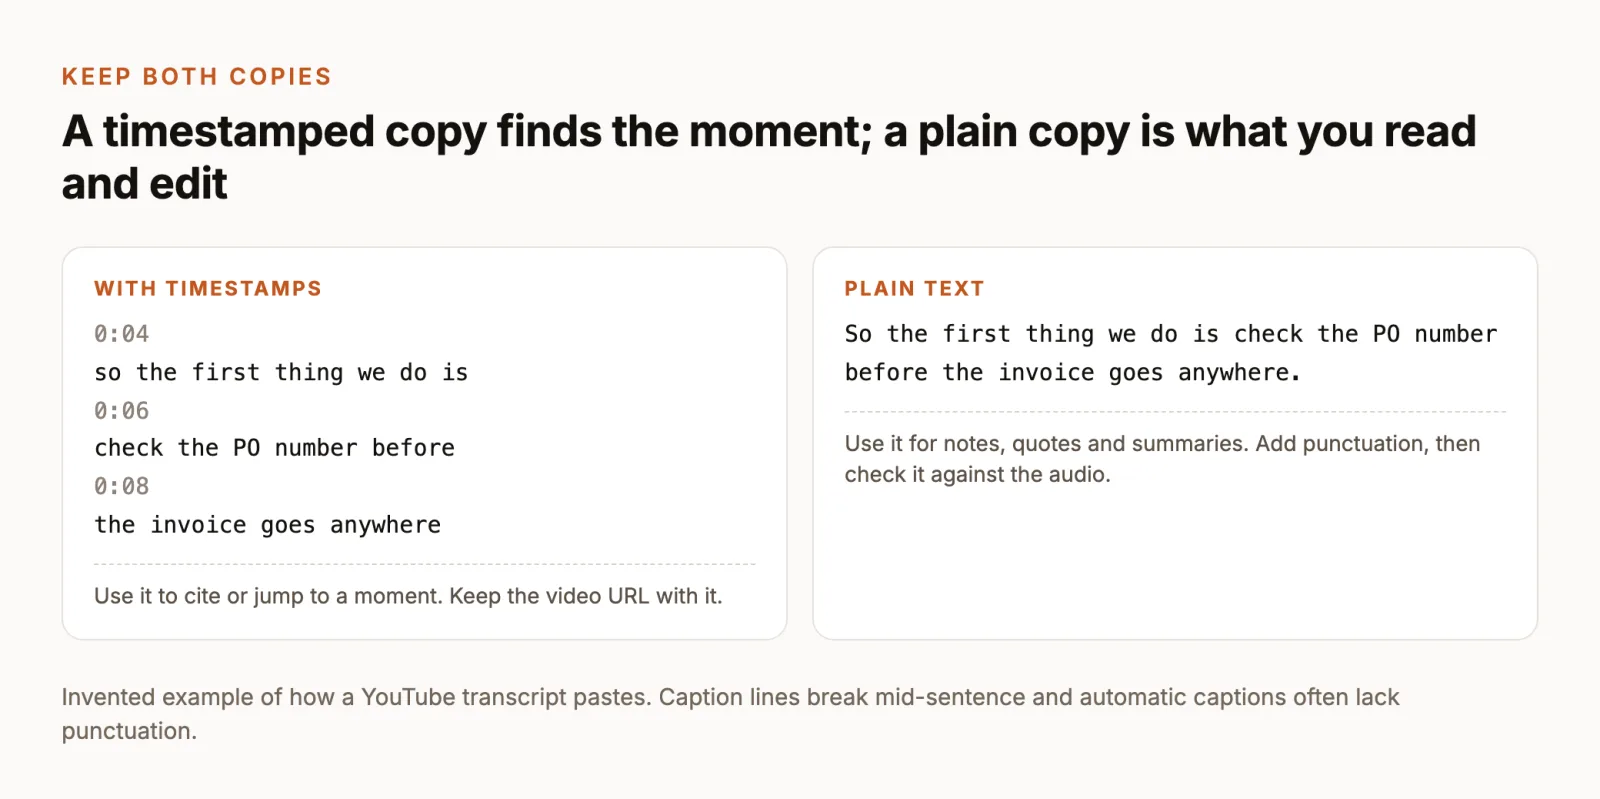
Keep a reference copy
Paste one untouched copy, timestamps included, at the top of your notes with the video’s URL and the date. It is your way back to the exact moment when you need to check a quote, and it stays unchanged however much you edit the readable version.
Make a readable copy
Caption lines break wherever the speaker paused, and automatic captions often have little punctuation. For notes or a summary, join the lines into paragraphs and add punctuation. Then replay the passages you’ll quote and fix names, numbers and technical terms; these are the words speech recognition gets wrong most often.
To search a transcript, use your browser’s find command (Ctrl+F or Cmd+F) while the panel is open. It searches the visible transcript text along with the rest of the page.
Why there’s no Show transcript button
The transcript is built from the video’s captions, so no captions means no button. Google’s automatic captions page lists why a video may not get automatic captions:
- Processing isn’t finished. Captions may not be ready when a video is uploaded; complex audio takes longer.
- The language isn’t supported by automatic captions.
- The video is too long.
- The sound is poor, or YouTube doesn’t recognize the speech.
- There’s a long silence at the start.
- Several people talk over each other, or several languages are spoken at once.
Creators can also turn captions off or never publish them. Live streams are a separate case: live automatic captions are English only, and they’re replaced after the stream by captions generated from the recording.
If it’s someone else’s video, check again later if it’s new, and otherwise ask the creator. Many creators work from a script or have captions they never uploaded. Don’t download the video or scrape its audio to transcribe it: YouTube’s Terms of Service restrict downloading content and accessing the service by automated means, such as scrapers, unless YouTube or the rights holder allows it.
Download captions for your own video in YouTube Studio
If the video is on your channel and has captions, you don’t need the public transcript panel. YouTube Studio downloads the caption track as a file (Google’s caption editing guide):
- Sign in to YouTube Studio.
- Select Subtitles in the left menu.
- Click the video.
- Next to the language you want, select Edit.
- Select Options → Download subtitles.
The file keeps the caption timing. If the track is automatic, review it first: in the same editor, Duplicate and edit creates a corrected track you can publish. Google says automatic captions can misrepresent speech because of mispronunciations, accents, dialects or background noise.
Transcribe your own video in ChatCut
When your video has no captions, or you want a transcript before you publish, transcribe the original recording. Use the camera file or your editor’s export, since it has the cleanest audio. If you only have the copy on YouTube, Studio can download your own uploads as MP4 at 720p or 360p under Content → Menu → Download, up to five times a day per video (Google’s download guide).
In ChatCut (Desktop for macOS 13+ and Windows 10+, or the web app):
- Import the file. Open My Assets → Upload → Files… and wait for the asset card to finish processing; speech is transcribed during import. Cloud transcription requires signing in, and it doesn’t use credits.
- Place it on the Timeline. Drag the card onto a video track.
- Turn on captions. Select the left side of the Captions control below the Viewer, and wait for transcription to finish.
- Read and correct. Open Transcript (or Workspace → Transcript). Click a word to jump to it, and fix mistakes by selecting them and choosing Edit text. Don’t press Delete to fix a typo: in the Transcript, deleting words cuts that stretch of video from the Timeline.
- Export the text. Choose Export → Subtitles, then SubRip (.srt) for a timed caption file or plain text (.txt) for a transcript (export docs). The option stays unavailable until the active caption track has finished transcribing.
The Transcript and Captions docs explain the panel in more detail, including speakers and translation. To get the agent to do the setup, attach the Add captions Skill and send:
Messages to the built-in Agent use credits; turning on captions and exporting by hand doesn’t.
Upload the SRT back to YouTube to replace automatic captions with corrected ones (Google’s guide to adding captions). For burned-in captions versus caption files, see our guide to adding subtitles. If you’re still editing the video, our YouTube editing guide covers the cut before upload.
Check the transcript before you quote or share it
A transcript is only as good as the captions behind it. Before the text goes into an article, a summary or a study:
- Replay every quote. Listen to each passage you’ll quote and compare it word for word.
- Check names and numbers. Proper nouns, figures and jargon are the usual errors in automatic captions.
- Keep the source. Store the video URL and timestamp next to each quote, from your reference copy.
- Mind the rights. Seeing a transcript doesn’t give you the right to republish it. Short quotes with attribution are usually fine for commentary, but fair use depends on the case; YouTube’s fair use page explains the four factors.
To read along with captions rather than copy them, turn them on with the CC button in the player; Settings → Subtitles/CC → Options changes their font, color and size (Google’s caption settings).